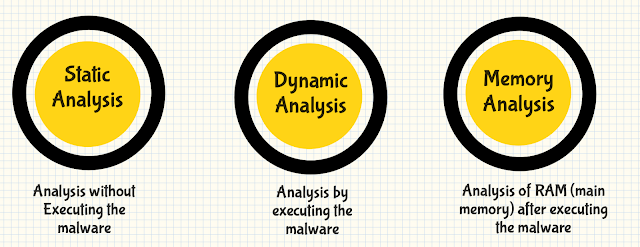
Limon is a sandbox developed as a research project written in python, which automatically collects, analyzes, and reports on the run time indicators of Linux malware. It allows one to inspect the Linux malware before execution, during execution, and after execution (post-mortem analysis) by performing static, dynamic and memory analysis using open source tools. Limon analyzes the malware in a controlled environment, monitors its activities and its child processes to determine the nature and purpose of the malware. It determines the malware’s process activity, interaction with the file system, network, it also performs memory analysis and stores the analyzed artifacts for later analysis. This document contains the details of setting up Limon for Linux malware analysis.
Limon download link: https://github.com/monnappa22/Limon
Analysis of Linux Malware Using Limon Sandbox: Analysis and video demo of Tsunami malware
Link to Black Hat Europe 2015 presentation: Automating Linux Malware Analysis Using Limon Sandbox
Working of Limon
Limon takes malware sample as input it performs static analysis, dynamic analysis, memory analysis and reports the result

Tools used by Limon
Limon relies on various open source tools to perform static, dynamic and memory analysis which means these tools need to installed (some of these tools need to be installed on the host machine and some in the analysis machine and some in both) for Limon to work. Some of these tools come installed with default Linux installations. Below is the list of tools Limon relies on
- YARA-python (https://github.com/plusvic/yara/releases)
- VirusTotal Public api (https://www.virustotal.com/en/documentation/public-api/)
- ssdeep (http://ssdeep.sourceforge.net/)
- strings utility (http://linux.die.net/man/1/strings)
- ldd (http://linux.die.net/man/1/ldd)
- readelf (https://sourceware.org/binutils/docs/binutils/readelf.html)
- Inetsim (http://www.inetsim.org/downloads.html)
- Tcpdump (http://www.tcpdump.org/)
- strace (http://linux.die.net/man/1/strace)
- Sysdig (http://www.sysdig.org)
- Volatility memory forensics framework (http://www.volatilityfoundation.org/#!releases/component_7140)
Setting up Limon
For Limon to work, proper setup of the environment is required (this is a one-time setup).Limon should work on any versions of Ubuntu (or other Linux), but it was tested on these versions of Ubuntu Linux mentioned below). This section gives an example setup (the ip address can vary, the below ip addresses and network configuration was used in the setup)

The setup consists of a host machine running Ubuntu 15.04 (64 bit) with VMware Workstation Installed and analysis machine running Ubuntu 12.04 or 14.04 (64 bit version) inside VMware Workstation in the bridge mode. Analysis machine is where the malware will be run, both host and analysis machine runs with root privileges. The ip address of the host machine is set to 192.168.1.3 and the ip address of the analysis machine is set to 192.168.1.150 and the gateway of the analysis machine is set to 192.168.1.3 (ip address of host machine) and the dns server on the analysis machine is set to 4.2.2.2. The idea of this setup is to make sure that when the malware is run in the analysis machine all its network traffic goes through the host machine where the packets will be captured.
1) Configuring and Installing tools on Host Machine
This section focuses on the tools that need to be installed on the host machine. After installation note down the path to all these tools, this is required later to update the variables in Limon so that Limon knows the path from where to invoke these tools. Most of the time “which” command on Linux can be used to determine the path of the tool. For example: if you want to determine the path of “ls” utility you can use the below command
# which ls
- a) VMware Workstation
Install VMware Workstation for Linux on the host machine (In this case VMware workstation 10.0.2 was installed on the host machine running Ubuntu 15.04). Once VMware Workstation is installed, install either Ubuntu 12.04 or Ubuntu 14.04 in the VMware workstation, this will be your analysis machine where Limon will run the malware samples
- b) yara 1.7.2 and YARA-Python
Limon relies on YARA for detecting packers and to determine the capabilities of malware using YARA rules. Download YARA from the below link
https://github.com/plusvic/yara/releases/tag/v1.7.2
Install YARA as mentioned in the below link:
http://yara.readthedocs.org/en/v3.4.0/gettingstarted.html#compiling-and-installing-yara
To install YARA-python, after you download the (.zip or .tar.gz) file, extract it and follow the procedure mentioned in README file in the yara-python directory.
- c) Ssdeep
Limon relies on ssdeep for fuzzy hashing. You can install ssdeep by executing the below command:
# apt-get install ssdeep
- d) Sysdig
Limon relies on sysdig for system event monitoring, you can install sysdig by following either following the basic install or advanced install procedure mentioned in the below link. In my case I had to follow the advanced debian based instal
http://www.sysdig.org/install/
- e) INetSim
Limon relies on INetSim to simulate all the services when run in the sandbox mode. Install inetsim by following the procedure from the below link
http://www.inetsim.org/documentation.html
- f) Volatility
Limon uses Volatility advanced memory forensics framework to perform memory analysis.
Volatility depends on various python modules, install all the dependencies by following the procedure mentioned in the link below
https://github.com/volatilityfoundation/volatility/wiki/Installation#dependencies
once all the dependencies are installed, download Volatility 2.4 from the below link
http://downloads.volatilityfoundation.org/releases/2.4/volatility-2.4.tar.gz
extract it and note down the path to vol.py
- g) Create a directory to store YARA rules
Create a directory /root/yara_rules. This directory contains yara rules which will be used by Limon. In my case this directory contains two files packer.yara (yara rules for packer detection) and capabilities.yara (yara rules to detect capabilities of the malware like IRC capabilities). You can add your own rules in a file like these (note down the path to these files)
- h) create a directory to store analysis results
Create a directory /root/linux_reports to store the analysis results. This is the directory where the final report, pcap and other artifacts are stored after analyzing the malware.
2) Configuring and Installing tools on Analysis Machine
This section focuses on the tools that need to be installed on the analysis machine. After installation note down the path to all these tools, this is required later to update the variables in Limon so that Limon knows the path in the analysis machine from where to invoke these tools.
- a) Set Root password and enable graphical root login
Set the root password on the analysis machine and enable graphical root login by following the procedure mentioned in the below link
or
you can also follow below procedure (works on Ubuntu 12.04)
1) set password for root
# sudo passwd root
2) Run the below command
# sudo sh -c ‘echo “greeter-show-manual-login=true” >> /etc/lightdm/lightdm.conf’
3) restart
4) click on login
enter username root and password
- b) Sysdig
Limon relies on sysdig for system event monitoring, you can install sysdig by following either following the basic install or advanced install procedure mentioned in the below link. In my case I had to follow the advanced debian based install
http://www.sysdig.org/install/
- c) Strace
Limon relies on strace for tracing system calls, strace is installed by default on the standard Linux install.
Note: if you are running Ubuntu 14.04 on the analysis machine, then remove strace (apt-get remove strace) which comes with default Ubuntu 14.04 installation, strace has a bug (mostly strace version 4.8) because of which it cannot trace child processes. Once removed download strace from this lin
http://sourceforge.net/projects/strace/
and Install strace from source by executing below commands
# tar xvzf strace-4.10.tar.xz
# cd strace-4.10
#./configure
# make
# make install
- d) PHP
To run php scripts install php by executing the below command
# apt-get install php5-cli
- e) Install packages to run 32 bit executable on 64 bit Ubuntu system
To run a 32-bit executable file on a 64-bit multi-architecture Ubuntu system, you have to add the i386 architecture and install the three library packages libc6:i386, libncurses5:i386, and libstdc++6:i386. These packages can be installed by running the below commands
On Ubuntu 14.04 and above run the below commands
# dpkg –add-architecture i386
# apt-get update
#apt-get install libc6:i386 libncurses5:i386 libstdc++6:i386
On Ubuntu 12.04 and below run the below commands
# echo “foreign-architecture i386” > /etc/dpkg/dpkg.cfg.d/multiarch
# sudo apt-get update
# sudo apt-get install libc6:i386 libncurses5:i386 libstdc++6:i386
- f) Create directory to transfer malware sample
On the analysis machine create a directory “/root/malware_analysis” and /root/logdir
add /root/malware_analysis to PATH environment variable by following below step
edit /etc/environment with text editor and then at the end add the path /root/malware_analysis (all the path should be seperated by colon as shown below)
ex: PATH=/usr/bin:/root/malware_analysis
- g) Create Volatility Profile
Limon relies on Volatility to perform memory analysis. After the malware is executed in the analysis machine, the analysis machine suspended to captures its memory image and memory analysis is performed. To successfully perform memory analysis Volatility profile for the analysis machine (in our case Ubuntu 12.04 or Ubuntu 14.04) need to be created. To create profile for the analysis machine follow the procedure mentioned in the below link:
https://github.com/volatilityfoundation/volatility/wiki/Linux
Profile is essentially a zip file with information on the kernel’s data structures and debugs symbols. Once this zip is created, then move this zip file under ‘volatility/plugins/overlays/linux on the host machine (where Volatility and its dependencies were installed)
- h) Clear Bash Hisory
Clear the bash history on the analysis machine by running the below command
# history -c && history –w
- i) take a cleansnapshot
Once all the tools are installed power off the analysis machine, power it on and then take a snapshot, in my case the name of the snapshot is “cleansnapshot” (note down the name)
Configuring Limon
Once all the necessary tools are installed on the host and analysis machine the next step is to configure the Limon
First download Limon from the below link
https://github.com/monnappa22/Limon
Unzip Limon. Configuring Limon involves updating the variables with appropriate values in conf.py file. Most of these variables are straight forward and these variables need to be set with appropriate values. The variables in conf.py are updated with sample values for reference.
Below are some of the variables in the conf.py which might need to be modified if it is different from the default values (do not modify other variables)
1) py_path -> This variable contains the path to the python interpreter on the host machine. You can get this path by running below command
# which python
Example: py_path = r’/usr/bin/python’
2) report_dir -> This is path to the directory where the final report will be stored in our case it is /root/linux_reports
Example: report_dir = r’/root/linux_reports’
3) virustotal_key -> This variable should contain the virustotal public api key
Example: virustotal_key = “enter virustotal public key here”
4) host_analysis_vmpath -> This variable should contain the path to the .vmx file of the analysis machine. In our case the .vmx is located in /root/virtual_machines/Ubuntu12_04/Ubuntu12_04.vmx
Example: host_analysis_vmpath = r’/root/virtual_machines/Ubuntu12_04/Ubuntu12_04.vmx’
5) host_vmrunpath -> This variable should contain the path to vmrun utilitly. This path can be determined by running the command
# which vmrun
Example: host_vmrunpath = r’/usr/bin/vmrun’
6) host_vmtype -> This is VMware type in our case it is workstation so this variable should be set with the value ‘ws’
Example: host_vmtype = r’ws’
7) analysis_username -> username of the analysis machine
Example: analysis_username = “enter username of the analysis machine”
8) analysis_password -> password of the analysis machine
Example: analysis_password = “enter password of the analysis machine”
9) analysis_clean_snapname -> name of the cleansnapshot. In our case it is “cleansnapshot”
Example: analysis_clean_snapname = “cleansnapshot”
10) analysis_mal_dir -> this is path on the analysis machine where the malware sample will be transferred. In our case it is “/root/malware_analysis”
Example: analysis_mal_dir = r”/root/malware_analysis”
11) analysis_py_path -> path to python interpreter on the analysis machine
Example: analysis_py_path = r’/usr/bin/python’
12) analysis_perl_path -> path to perl interpreter on the analysis machine
Example: analysis_perl_path = r’/usr/bin/perl’
13) analysis_bash_path -> path to bash shell
Example: analysis_bash_path = r’/bin/bash’
14) analysis_sh_path -> path to shell
Example: analysis_sh_path = r’/bin/sh’
15) analysis_insmod_path -> path to insmod
Example: analysis_insmod_path = r’/sbin/insmod’
16) analysis_php_path -> path to php interpreter
Example: analysis_php_path = r’/usr/bin/php’
17) yara_packer_rules -> path to yara rules to detect packers
Example: yara_packer_rules = r’/root/yara_rules/packer.yara’
18) yara_rules -> path to yara rules, in our case it contains rules to detect malware capabilities like IRC capability
Example: yara_rules = r’/root/yara_rules/capabilities.yara’
19) analysis_ip -> IP address of the analysis machine in our setup it is 192.168.1.150
Example: analysis_ip = “192.168.1.150”
20) host_iface_to_sniff -> This is the interface on the host machine on which the packets will be captured while malware is executing
Example: host_iface_to_sniff = “eth0”
21) host_tcpdumppath -> path to tcpdump on the host machine, This path can be determined by using the command “which tcpdump”
Example: host_tcpdumppath = “/usr/sbin/tcpdump”
22) vol_path -> path to Volatility(vol.py) script on the host machine.
Example: vol_path = r’/root/Volatility/vol.py’
23) mem_image_profile -> Name of the Volatility profile for the analysis machine. In our case name of the profile is “LinuxUbuntu1204x64”. So the value of the variable is set as shown below:
Example: mem_image_profile = ‘–profile=LinuxUbuntu1204x64’
24) inetsim_path -> path to the INetSim
Example: inetsim_path = r”/usr/share/inetsim/inetsim”
25) inetsim_log_dir -> path to INetSim log directory
Example: inetsim_log_dir = r”/usr/share/inetsim/log”
26) inetsim_report_dir -> path to INetSim report directory
Example: inetsim_report_dir = r”/usr/share/inetsim/report”
27) analysis_sysdig_path -> path to sysdig on the analysis machine
Example: analysis_sysdig_path = r’/usr/bin/sysdig’
28) host_sysdig_path -> path to sysdig on the host machine
Example: host_sysdig_path = r’/usr/bin/sysdig’
29) analysis_capture_out_file ->This is the temporary file on the analysis machine where sysdig events are saved. Do not modify this value and make sure the logdir exists under /root. The default value is shown below
Example: analysis_capture_out_file = r’/root/logdir/capture.scap’
30) analysis_strace_path -> path to strace on analysis machine (ex: /usr/bin/strace
Example: analysis_strace_path = r’/usr/bin/strace’
31) analysis_strace_out_file -> This is the temporary file on the analysis machine where call trace events are saved. Do not modify this value and make sure the logdir exists under /root. The default value is shown below
Example: analysis_strace_out_file = r’/root/logdir/trace.txt’
32) analysis_log_outpath -> This is the directory on the analysis machine where temporary artifacts will be saved. Do not modify this value and make sure the logdir exists under /root. . The default value is shown below
Example: analysis_log_outpath = r’/root/logdir’
Options in Limon
Limon comes with various options and supports analysis of various file types. The below screenshot shows options in Limon and running a Linux malware sample “tsuna” for 40 seconds. With –m option Limon also performs memory analysis
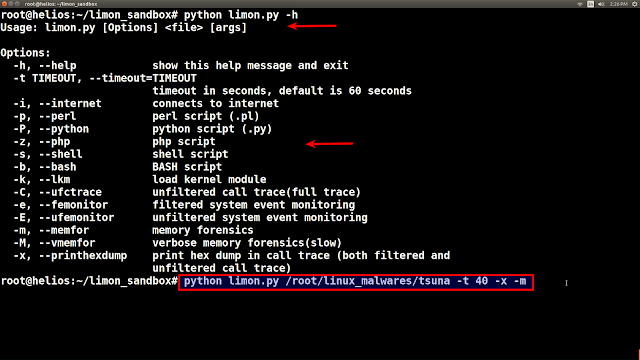
Limon by default uses strace with filtered call trace for performing dynamic analysis. In filtered call trace it just traces few system calls that are commonly used by malwares (like process, file and network related system calls). This is less noisy
For more verbose call tracing (i.e to trace all system calls)
–C (–ufctrace) option can be used, this will trace all the system calls using strace. This will generate verbose output
Limon can also monitor system calls using Sysdig, Sysdig just supports event monitoring for x64 bit files.
-e (–femonitor) This option performs event monitoring with Sysdig, In this case only system calls commonly used by malware are monitored. This is less noisy.
-E (–ufemonitor) This option performs event monitoring with Sysdig, In this case all system calls are monitored. This is generate verbose output.
-m (–memfor) This options performs memory analysis (along with static and dynamic analysis). Limon relies on Volatility memory forensics framework to perform memory analysis. This options runs most of the Volatility plugins except some plugins which takes some time to run.
-M (–vmemfor) This options performs verbose memory analysis (along with static and dynamic analysis) using Volatility. This options runs all the Volatility plugins including the plugins that takes time. This can be slightly slow.
-x (–printhexdump) This option prints hex dump in the call trace
Examples
Some examples of using Limon can be found here
The below examples should give an idea on running Limon
1) Running an ELF binary in Limon using sanbox mode (runs for 60 seconds by default) without memory analysis (just performs static and dynamic analysis)
# python limon.py <malware sample>
2) Running an ELF binary in Limon using internet mode (runs for 60 seconds by default) without memory analysis (just performs static and dynamic analysis)
# python limon.py <malware sample> -i
3) Running an ELF binary in Limon for 40 seconds in the sandbox mode with unfiltered call trace
# python limon.py <malware sample> -t 40 -C
4) Running a perl script in Limon for 25 seconds with filtered system monitoring
# python limon.py –p <malicious.pl> -t 25 –e
For more details and analysis of Linux malware using Limon:
http://malware-unplugged.blogspot.com/2015/11/limon-sandbox-for-analyzing-linux.html
Link to Black Hat Europe 2015 presentation: Automating Linux Malware Analysis Using Limon Sandbox
Limon download link: https://github.com/cysinfo/Limon
For any queries, send an email to: